It’s no secret that I’m a huge fan of Handbrake. After committing to copying my DVD collection to my storage array, I’ve tried and tested just about all software out there for converting video to H.264 with an emphasis on quality and speed. Many software packages have problems with quality or desynchronized audio, Handbrake is my hands-down favorite when it comes down to converting video — and that includes both free and commercial software.
One of the complaints I hear about Handbrake is that there are too many options. Well, the good news for someone looking for simplicity is that the built-in presets mostly take care of them for you. And for anyone who likes to dive into the nitty gritty of video compression, it also allows for a lot of tweaking to get the most out of your movie while maintaining small file sizes and high quality.
This guide was done on the Windows version but the other versions are all very similar. Also it assumes that there is no copy protection on the disc. If you have copy protection and it is legal in your country to remove it, you can use DVD43 (free), AnyDVD (paid), or other software to do so. If you have a particular question regarding Handbrake, be sure to ask in the comments below and I will get back to you as soon as possible. Thanks to the developers of Handbrake for the great piece of software they have put together! Many of the answers I am supplying below are available via the Handbrake wiki, which is also where you should go if you are looking for more detailed information on a particular item. On to the list!
The Main Menu
![]()
You will mainly use 2 buttons here – Source and Start. Source lets you select the DVD you wish to rip from, which is either the disc directly, or the “video_ts” folder if it is stored on your drive. Start begins the encoding process. If you want to run more than one at once, you would Start the first one, then “Add to Queue” to add it to the list of encodings it will do next. The Show Queue button allows you to reorganize or delete upcoming encodings.
Source Information
![]()
This area shows you information about your current disc. It will automatically select the largest title and most movies have only one angle. If you only want to encode a certain chapter or section of the disc, this is where you would select it.
Output File
![]()
Select where you would like to send the file when done, easy enough!
Output Settings

Container: MP4 or MKV. This depends on where you want to play the file – MP4 is usually more compatible but MKV can have more flexibility.
Large File Size: This mainly seems to be depreciated but you used to have problems playing files larger than 4GB on some devices if this is not checked.
Web Optimized: Assists with streaming via web – if you do not plan on hosting the video online it is safe to keep this off.
iPod 5G support: Only useful if you plan on playing video on a 5th Generation iPod.
Presets
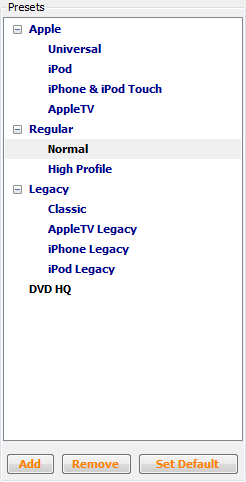
Presets are the easiest way to get encoding fast. The Regular->Normal setting seems to work best both on my local PC and my HTPC. For movies with a lot of special effects where I am looking for higher quality (sacrificing longer encoding times and more hard drive usage) I will move to High Profile. If you are planning on making the movie portable, select the device which closest matches the one you have. It should shrink it down to whatever size you need.
You can also save new presets. If you like to encode a movie a certain way or for a certain device, feel free to change the settings and then ‘Add’ a new profile.
Picture
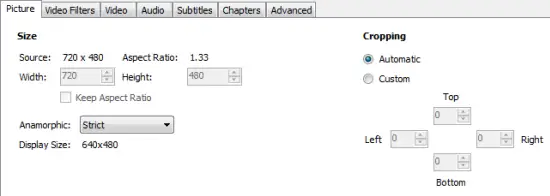
Source: Resolution of the original video.
Aspect ratio: Whether the original should be “stretched” and how much.
Anamorphic: How much the original should retain its resultion. I keep this on “Strict” most of the time. If you move it to different settings, you may need to specify the resolution, but in general it is best to keep the resolution the same.
Cropping: Best left to automatic – will remove any black bars on the top, bottom or sides of the video. If you find it missed the, select custom and then how much you want to chop off.
Video Filters
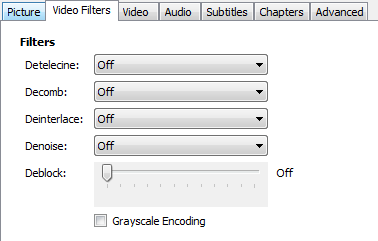
Detelecine: This has to do with how the video is interlaced when framerates are changed around. See Handbrake’s wiki for a technical explanation.
Decomb: Similar to Detelecine, this looks at every pixel. While having better results, it will slow down your encode. See more details.
Deinterlace: Deinterlaces every frame an can result in some loss of quality to the video. Removes the lines you sometimes see when anything is moving quickly across the screen.
Denoise: This will filter out noise and film grain from the video.
Deblock: This will remove blocky video due to compression or low quality.
Grayscale Encoding: Your movie will be in black & white.
Generally speaking I leave these options off as they slow down video and also alter the video from what is on the DVD. If you want to keep original quality, keep them off, otherwise feel free to customize to your needs. There is a great Handbrake wiki settings page which explain them further in technical detail.
Video

Video codec: H.264 or MPEG-4 via ffmpeg. In most situations H.264 is superior as the video codec.
Framerate: Highly recommend keeping this same as source. Otherwise your audio and video might get desynchronized.
Quality: I usually go for Constant quality anywhere from 60 to 75. Target size is good if you are trying to fit it on a CD or DVD, and Avg Bitrate is used on some older devices.
Audio

If you want to encode the video only with English then it is usually OK to leave this area alone. You can add other audio tracks to your movie by clicking “Add track” and then selecting the source. Mixdown if you don’t expect to play the movie on a full-speaker system, but keep the bitrate at 160 or more. DRC stands for Dynamic Range Compression – setting this higher will help reduce the differences between the soft and loud moments in the movie.
Subtitles

MakeUseOf covered Subtitles on Handbrake last year, you can review it on that article.
Chapters
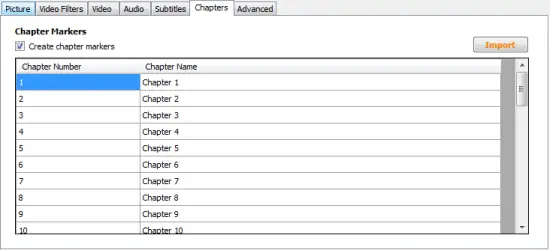
Some software will allow you to fast forward or rewind based on the chapters in the file. Handbrake will automatically convert your DVD chapters into the file, tweak them here as needed.
Advanced
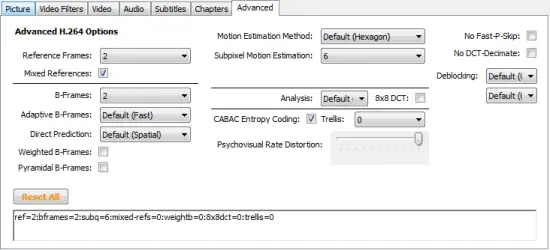
Handbrake allows you to change all sorts of settings within the h.264 encoder. These are for advanced users, but below is a summary of the settings just in case you find a need to tweak them for a movie you are encoding.
| Reference Frames | B-Frames |
| Adaptive B-Frames | Direct Prediction |
| Weighted B-Frames | Pyramidal B-Frames |
| Motion Estimation Method | Subpixel Motion Estimation |
| Analysis | 8×8 DCT |
| CABAC Entropy Coding | No Fast-P-Skip |
| No DCT-Decimate | Deblocking |
Instead of rehashing what is already over on the Handbrake wiki article H.264 options, you can just head over there for the gory details. These are tweaks which control how the video is compressed. The only reason to change them is if you are trying to encode a video and are not getting the quality or compression results you are expecting.
Get Encoding!
Hopefully this guide will help you to understand Handbrake and all that it is capable of. This is one of the most important tools in the savvy media connoisseur’s toolbox, and I hope you have found it as useful as I have. Let us know if you have any questions in the comments area below.


3 comments
What a fantastic critic on HandBrake!
Thank you it helped immensely.
One question though.
If I don’t want to see black bars on my widescreen television, then what video setting should I choose.
I tried anamorphic strict and it has these ugly black bars.
Thanks
Are your black bars on the top/bottom or left/right? Can you tell if they are built into the video – for example when you have the movie windowed, do they still show in the box? If so, you might need to tweak ‘crop’ to get them off.
If you was aiming for file size, is it worth doing 2 passes? 1 pass in handbrake takes the same time as a 2 pass in AutoGK, but a 2 pass in handbrake takes alot longer. So is it worth sticking with xvid, or is a 1 pass with x264 better than xvid? I’m kinda aiming for speed>quality
Comments are closed.