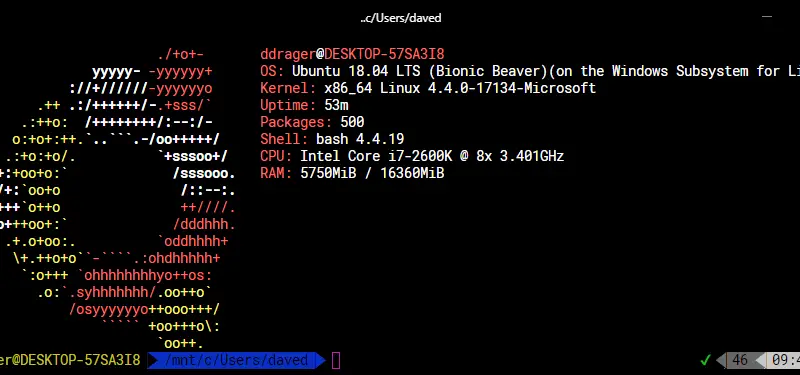
With the advent of Windows Subsystem for Linux – or WSL – it’s become very easy for developers to run Windows 10 on the desktop and the applications they develop on Linux. Sure, you can run most applications natively in Windows – but sometimes it’s just easier to run it in a Linux container for simplicity sake. For those that don’t have the option of running Linux on the desktop full time for a variety of reasons, and don’t feel like the mess of dual-booting, this is a great and simple solution! We will be running Ubuntu 18.10 on Windows 10 via WSL, interfacing with it using Oh My Zsh and Hyper.JS terminal.
I’m going to go right ahead and assume you’re already a developer interested in getting started since you are reading this article, so I’ll jump right into it:
Installing WSL
Start by installing Windows Subsystem For Linux. You must have the Windows 10 Fall Creators Update (Build 16215 or later) to run WSL. Open a powershell using ‘Run as Administrator’ and enter the command:
Enable-WindowsOptionalFeature -Online -FeatureName Microsoft-Windows-Subsystem-Linux
For more information on installing WSL on Windows 10, check out the Microsoft WSL Install page.
Install Ubuntu (or weapon of choice)
The easiest and best way to install Ubuntu is to go to the Microsoft Store and install from there.

After it’s installed, run it from your Start Menu

On the first initialization, it will run some installation tasks and prompt you for a username and password. This will be your Ubuntu username, and you’ll use the password later to install any software.
Since you are reading this I’ll assume you know how to do some basic linux tasks. First, I like to run sudo apt update && sudo apt upgrade to upgrade all of the system software to the latest packages.
Getting Developer Tools Ready
That’s really as simple as it is to get a bare-bones Ubuntu install ready on Windows 10! git is already installed, as well as some simple command line programs. If you are new to Ubuntu and Linux, I would recommend getting comfortable with command line first.
The Ubuntu WSL image run on a separate file subsystem however your normal drives are mounted in an easy to use fashion. Here is a listing of my C: and D: drives:
C: on /mnt/c type drvfs (rw,noatime,uid=1000,gid=1000)
D: on /mnt/d type drvfs (rw,noatime,uid=1000,gid=1000)
For example, I’ll be running most of my code in /mnt/c/Users/daved/ as this maps to my home directory on Windows. You can use the developer tools of your choice from here on out. I’ll explain how I use my tools of choice in this mixed environment.
Installing Oh My ZSH
ZSH is a great shell alternative to bash which adds a lot of features. Basically, it will help to increase your productivity on the command line and your overall environment as a developer! We will use this later with Hyper to maximize your productivity.
ddrager@DESKTOP-57SA3I8:/mnt/c/Users/daved$ sudo apt-get install zsh
[sudo] password for ddrager:
Reading package lists... Done
Building dependency tree
Reading state information... Done
The following additional packages will be installed:
  zsh-common
Suggested packages:
  zsh-doc
The following NEW packages will be installed:
  zsh zsh-common
0 upgraded, 2 newly installed, 0 to remove and 0 not upgraded.
Need to get 4066 kB of archives.
After this operation, 15.2 MB of additional disk space will be used.
Do you want to continue? [Y/n] y
Get:1 http://archive.ubuntu.com/ubuntu bionic-updates/main amd64 zsh-common all 5.4.2-3ubuntu3.1 [3376 kB]
Get:2 http://archive.ubuntu.com/ubuntu bionic-updates/main amd64 zsh amd64 5.4.2-3ubuntu3.1 [690 kB]
Fetched 4066 kB in 6s (733 kB/s)
Selecting previously unselected package zsh-common.
(Reading database ... 28595 files and directories currently installed.)
Preparing to unpack .../zsh-common_5.4.2-3ubuntu3.1_all.deb ...
Unpacking zsh-common (5.4.2-3ubuntu3.1) ...
Selecting previously unselected package zsh.
Preparing to unpack .../zsh_5.4.2-3ubuntu3.1_amd64.deb ...
Unpacking zsh (5.4.2-3ubuntu3.1) ...
Setting up zsh-common (5.4.2-3ubuntu3.1) ...
Processing triggers for man-db (2.8.3-2ubuntu0.1) ...
Setting up zsh (5.4.2-3ubuntu3.1) ...
Now set up your default shell to zsh. The following command will back up your .bashrc, and replace it with a new one that uses zsh as your shell:
cp ~/.bashrc ~/.bashrc.bak
cat > ~/.bashrc << 'EOL'
screenfetch
bash -c zsh
# ~/.bashrc: executed by bash(1) for non-login shells.
# see /usr/share/doc/bash/examples/startup-files (in the package bash-doc)
# for examples
# If not running interactively, don't do anything
case $- in
EOL
Then install Oh My Zsh:
sh -c "$(curl -fsSL https://raw.githubusercontent.com/robbyrussell/oh-my-zsh/master/tools/install.sh)"
This will launch you into the ZSH shell. You may see some question mark characters on your command line, like this:

Now hopefully you have ZSH set up. At this point, you should be done with the default Ubuntu experience in WSL.
Installing Hyper.JS on Windows
Navigate over to the Hyper.JS homepage and download the installer program for windows. By default, it opens a Windows shell. We are going to change that in a second:

First, let’s install the powerline fonts. This is necessary for Oh My Zsh as some additional fontfaces are used to style the terminal. Follow these directions for installing powerline fonts on Windows 10.
We’ll now configure Hyper.JS to utilize our new Ubuntu / Oh My Zsh environment for shells, and the correct font. You do this through Hyper.JS’s Menu -> Edit -> Preferences.
There are two main lines we need to change. The first is the font:
fontFamily: '"Roboto Mono for Powerline"',
The second is updating Hyper.JS so that it will open our new Ubuntu WSL bash command (which then runs the zsh shell).
shell: 'C:\\Windows\\System32\\bash.exe',
Close and reopen Hyper, and you will be in!

Further Tips
Oh My Zsh looks for the program screenfetch to display some system information when logging in. You’ll get an error if that isn’t installed. Install it with sudo apt install screenfetch.
Themes, themes and themes! There are some great themes for Hyper.JS and ZSH. My favorite for ZSH is probably powerlevel9k. Hyper’s themes are all available here. Instructions are included at those locations.
Get Productive!
Now that you have a full Ubuntu image running, wrapped in a Hyper.JS terminal, the sky is the limit! Here are some ideas:
- Run MySQL, redis, memcache and other system services in the Ubuntu (or other) environment.
- Code on Windows, Run on Linux
- Deploy code how it was meant to be done!
If you have any feedback on this process, leave it in comments below.
